Latest Tips
Pin Frequently Used Excel and Word Documents for Ease of Access
Password Protect Excel and Word Documents
Unlink Website and Gmail id Association
Translate From English to Regional Languages
Dictation in Regional Languages
Speech to Text
Schedule Yor Email on Gmail
Many a times we loose our bookmarks.
If Google Chrome is required to reinstall OR for any reason if Operating system is required to reinstall, we may loose our bookmarks.
We can export all Bookmarks and save the file, which can be imported whenever required. To export the bookmarks click on Chrome Settings >Bookmark Manager >Click on Settings >Export Bookmarks> Save to desired location.
To Import repeat the same and import the file saved from the location it was saved earlier.
Open VLC Player , Click on Media > Convert /Save > in Add option select video file > Click on Convert > Select Profile as Audio MP3 > in destination select location to save audio file > click on Start
Interesting Facts
The Internet you see today is expanding faster than you can imagine. Since the dawn of the Internet, the number of websites has gone up drastically and so has the amount of data stored on the web.
Recent estimates and data released by Google have revealed some very shocking facts about the internet.
- According to Google, the Internet consisted of 5 Million Terabytes of Data way back in 2010.
The most surprising fact is that Google itself said that they had indexed just 0.004% of all the content present on the internet. As of October 14th, 2018, at least 4.46 billion pages exist on the internet. That's huge! - As of October 2018, There are more than 1.9 billion websites on the Internet.
To add more numbers to the data, as of 14th October 2018, there are around 441 million Tumblr blogs on the web. 75.8 million blogs and business sites in existence are on WordPress. Moreover, more than 5 million blog posts are published every single day. - Internet users consumed one zettabyte bandwidth in 2016.
One Zettabyte is equal to a thousand Exabytes, a billion Terabytes, or trillion Gigabytes. By the year 2021, 82% of all IP traffic will be video, predicts Cisco. - 4 Billion out of the 7 Billion people on earth are already online.
InternetLiveStats (ILS) monitors the active state of the internet, and as at October 2018, there are 4,045,421,895 users on the web. This is expected to grow even more by the year 2020. - The world's first website is still online.
The first website created was info.cern.ch, and it is still online. It's a basic HTML site, and the page contains a few lines of text. The page was written with the help of the first version of HTML. - 85,000+ websites are hacked every day.
WordPress and Joomla are the most affected CMS (content management systems) on the Internet. - 5000 domain names are registered every hour.
That translates the number to a whopping 120,000 Domains every single day and 43 million domain names a year. The irony? More than 75% of Domains are parked or not resolving, that's the reason why you don't get your desired .com domain name. - The Internet took just four years to reach its first 50 Million Users.
Television took 13 years. While the radio took 38 years to reach the same number of users. That's cool! - 51% of all internet's traffic is Fake.
Humans make up 49% of the entire traffic; various bots and spamming software trigger the rest. No doubt, we would have faster connectivity if they weren't leeching on bandwidth.
Courtesy : Life Hacks
Search for relevant keywords
For example Type "weather" or "movies" followed by a pin code or city to display current weather conditions or movie theaters in your area. For example, typing weather 400028 gives you the current weather conditions for Mumbai City. Typing movies 400028 gives you a link for show times for movies in that area.
Definitions
Pull up the definition of the word by typing define followed by the word you want to define. For example, typing: define speed would display the definition of "speed"
Find PDF results only
Add fileType: to your search to display results that only match a certain file type. For example, if you wanted to display PDF results only
type: manual HP laser printer 1020 filetype:pdf this is a great way to find online manuals.
Calculator
Type calculator in the search bar it shows you a scientific calculator screen.
Use number ranges in a search
Google supports number ranges, for example, if you are searching for computer help between the year 2000 to 2005 you can type: "Computer help" 2000..2005
Timer / Stopwatch
Type timer / stopwatch in google gives you a timer or stopwatch which will give you either a predefined timer or stopwatch.
Unit Conversion
Type unit conversion in the google search bar, it will give you unit conversions for most commonly used units.
- k= Pause/Play a video.
- j= Rewind the video by 10 seconds.
- l= Fast forward the video by 10 seconds.
- f=full screen
- m= Mute a video
Skip Videos at specific intervals
While watching any video, You can just press any of the number keys (not from the numpad, but from the top row, below the function keys) from 0 to 9 to skip parts of the video. For example If you press '3', you'll skip 30% of the video from the beginning, if you press 4, you will skip 40% of the video from the begining. Pressing 0 will get you to the beginning of the video.
Start Videos at a specific time
If you have seen a particular youtube video upto 35 minutes and you want to resume watching the same someday later. You can get to the particular point in the video by adding #t= followed by the time instance to the end of your YouTube video URL. For eg, #t=35m
Tips-n-Tricks -Archives
How to Restore Recently Closed Tabs in Chrome
We often accidentally close our browsing tab in Google Chrome while surfing. Then you realise you still needed that webpage but you forgot the URL OR you forgot to bookmark it.
To Reopen them
Press Ctrl + Shift + t
OR Right Click on Title bar (Tab bar) of Chrome and click on "Reopen Closed Tab"
- Do not use on Power constantly, this reduces the battery life, instead drain the battery and plug it only when the laptop asks for the power connection.
- After using the laptop, do not keep it in the bag immediately let it cool down for a while.
- While in the bag the adaptor should not be kept on the screen side the adaptor weight will spoil the screen.
- If connected to Internet, it might download updates, while Shutdown it will load them, do not switch OFF & keep it connected to the Power (it should not be on Battery.)
- Give sufficient clear space for the Laptop's exhaust FAN (Do not use laptop keeping it on Bed, or do not keep any material in front of the exhaust fan and block hot air)
- CD / DVD should be loaded safely in the Drive.
- Keep the laptop away from liquids (water / tea / coffee). In case if anything gets spilt, switch OFF the laptop and remove the Battery immediately, do not switch ON for at least 3 days, take it to the service center asap.
- While keeping it in the Bag, keep the screen side UP.
- Hold and lift the computer by its base, not by its LCD display (the screen)
- Take proper care of laptop adapter cable / power cord so that it does not get jammed in drawers or under your chair.
- Avoid placing heavy materials, such as books, on top of your laptop while travelling.
- Use the keyboard gently.
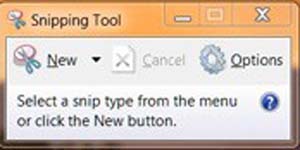
Take a quick cropped screenshot
Often, we need to capture a portion of the screen for easy future references. The old-school Windows method of taking a screen shot is : Hit the Print Screen key, open Windows Paint (or another image editor), and hit Paste. You'd then save the resulting file.
This can be easily achieved by using the inbuilt tool of windows operating system.
The Snipping Tool adds functionality that eliminates the need to open additional programs to crop or otherwise manipulate the screenshot.
The easiest way to access the Snipping Tool is to type the words Snipping Tool into the Start menu's search box and hit Enter. When it launches, Click on New and then you'll get a cursor that looks like a cross; drag it (with the left mouse button pressed) over the region you want to capture, and release it.
A window with the "snipped" area will pop up. You can now save it to a location on your computer.
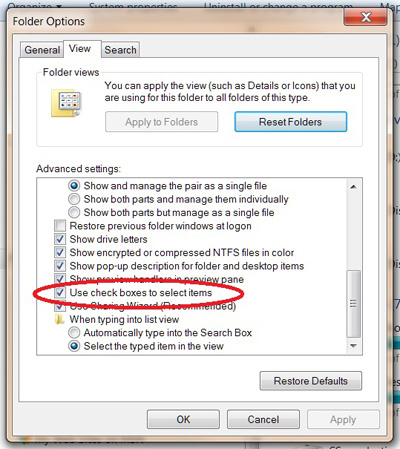
If you have a folder full of MP3 files or vacation photos, and you want to copy only selected files. Old way : Hold down Ctrl (control) key while you click on each file with mouse
It will be easier if we get check box to select files.
There's an easier way in Windows 7, though you need to activate it. In a given folder, click on the "Organize" button at the top of the Windows Explorer window. Choose the "Folder and search options" entry from the menu that ensues, to launch the Folder Options dialog box. You'll see three tabs; click the one called "View". In the "Advanced settings" list that appears, scroll down and look for the entry "Use check boxes to select items". Make sure it is ticked, then hit OK. We have circled the appropriate option here:
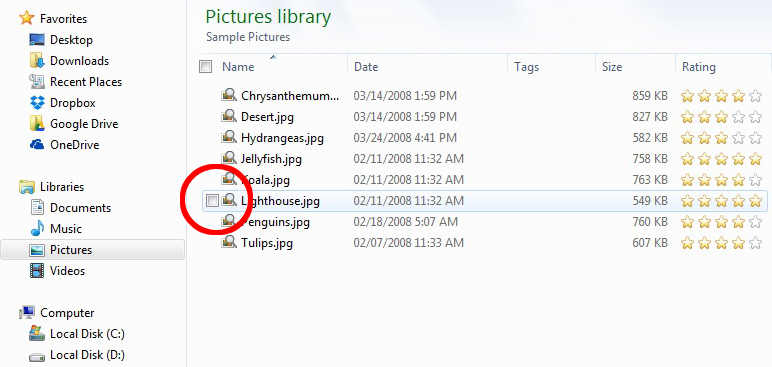
In the relevant folder, if you're looking at it in a file-thumbnail view, you'll now see empty check boxes next to the files' individual thumbnails. Otherwise, if you're in a list or detail view, check boxes will appear if you hover your cursor just to the left of the line items, like they do here:
Printing a folder listing is something you may think is not required, but when you need to print a listing of a folder with a lot of files in it, you would rather not manually type the filenames.
You may want to print a folder listing of your videos, music, e-books, or other media. Or, someone at work may need this to ensure that the backup has been done properly of the required folders. Automatically creating a folder listing would get the task done quickly and easily.
Using the Command Line
In Windows Explorer, navigate to the folder for which you want to print or save the listing. Press the Shift key while right-clicking on the folder. Select "Open command window here" from the popup menu.

At the command prompt, type the following command and press Enter.
dir > print.txt

A file called print.txt is created in the folder which can be later opened in a text editor or MS Excel.
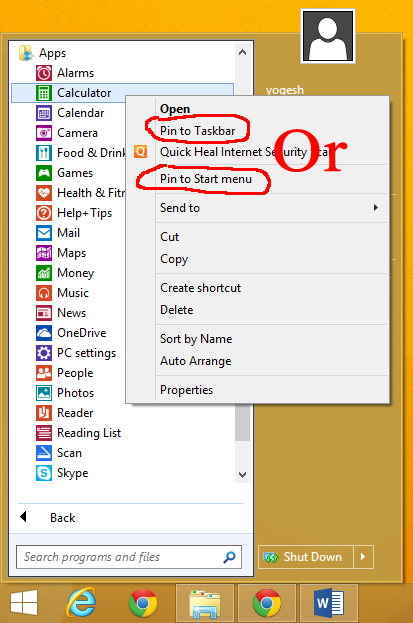
We use various applications every day, yet there are some applications that we need to use over and over again endless number of times. It becomes very difficult every time to click on the Start Menu then All Programs then selecting the Application Group and then selecting the Application desired for use.
It will be easier if we could have the application pinned to the Start Menu or Taskbar.
Essentially, pinning an app to the taskbar simulates the old Quick Launch bar in earlier versions of Windows. (Quick Launch was the series of little program icons on the left side of the taskbar; it disappeared with Windows 7.) Pinning a program is easy: Right-click on a program's icon on the desktop or Start menu and choose "Pin to taskbar".
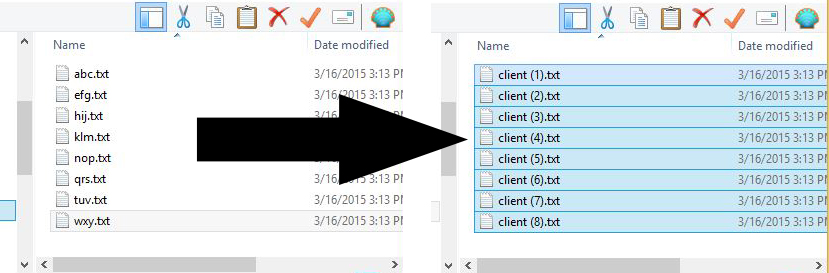
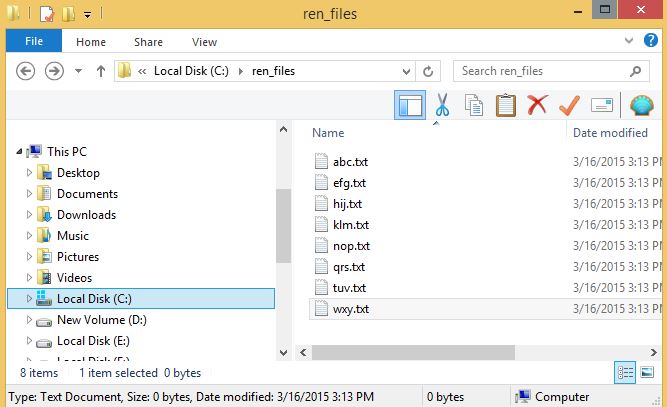
Windows can rename multiples files at once from Windows Explorer.
Windows Explorer has a quick, built-in way to rename multiple files at once, although it's pretty well hidden.
Locate the files you want to rename and place them in the same folder. Use the columns at the top of the list in details view to order the files how you'd like them – Windows Explorer will number the files starting from the top at the list.
Multiple Clocks in the Windows 7 Tray
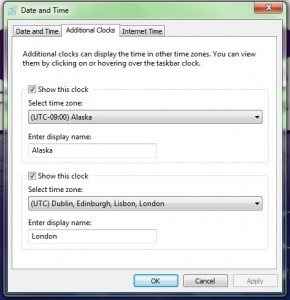
At times we need to view multiple clocks from different countries for various reasons. In Windows 7 we can view 3 clocks simultaneously in the system tray.
Here's a way to achieve the same.
The clock shows the current time along with today's date, whereas previous versions of Windows only showed the time by default.

If you click on the clock in the system tray, you'll see an analog clock showing the current time along with a calendar showing today's date. You can change the time or add more clocks by clicking the "Change date and time settings" link in the bottom.
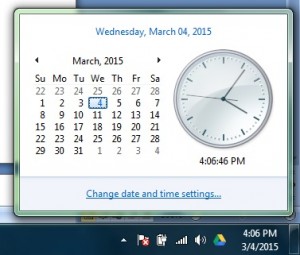
This will open the Date and Time dialog box, where you can change your system time, date, and time zone.
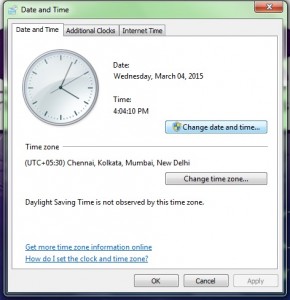
To add additional clocks to the taskbar, select the Additional Clocks tab. You can add up to two additional clocks; just check "Show this clock" beside one or both clocks, select the time zone you want the clock to show, and enter a name that will help you remember what that time's for.
Now you can quickly see the time in all three places by simply hovering over the clock in your taskbar.
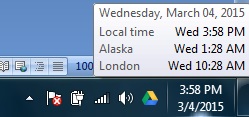
If you click on the clock in the taskbar, you'll now see 3 clocks. The larger one is the current time in your time zone, while the other clocks are the extra ones you added before. They'll even show the correct day of the week below the clock if it's currently a different day in these time zones.

- Create a password that has eight or more characters since this is usually the minimum for most password requirements. The longer the password the more secure it will be.
- Form a "random" sequence of words and/or letters. Create a phrase or series of letters that is seemingly "random" but is easy to remember. Call this your "base-word."
- Example: Your children are Amit and Shalmali, so your base-word becomes "amiali" or "amsh".
- Example: Building Name is Uday Vihar becomes "bldguday" or "bldgudayvihar".
- Add numbers to the base-word to make it more secure.
- Example: Add the ages of the children to the end making it "amiali1411" or "amsh1411".
- Example: Add the plot number number to the end of the base-word to create "bldguday1937" or "bldgudayvihar1937".
- Use Symbols to complicate it further
- Example: Add $ and/or # in it. "amiali$1411#" or "amsh$1411#".
- Example: Add $ and/or # in it. "bldguday#1937$" or "bldgudayvihar#1937$".
- Create Complexity with upper and lowercase letters
- Example: "AmiAli$1411#" or "aMsH$1411#".
- Example: "bldGudaY#1937$" or "bldGudaYvihaR#1937$".
- Generate similar but altered passwords. In some cases like bank login, online share trading, you are required to change password after every 15 days, you can use these similar but altered passwords there.
- Example: "1411#AmiAli$" or "1411#aMsH$".
- Example: "1937$bldGudaY#" or "1937$bldGudaYvihaR#".
- Take a word say "money" or your name, spell it backwards (yenom) and add your birthdate in between.
- Ex. 28 Oct 1970 then "y28enoctom70"
- Ex. If "shirish" then "shi28rioctsh70"
Using the above techniques create 3-4 passwords and use them alternatively so as to remember them easily and you don't have to remember too many passwords.
System Restore is an Application which restores your Computer System to an earlier Working State back in Time. It is not a tool for Data Backup as it does not change any of your data folders.
Even though System Restore creates restore points automatically based on various criteria, you should create one manually if you are going to perform some major change to your system. This includes hardware changes, installation or removal of an application, etc.
To manually create a restore point:
- Click the Start button.
- Point your mouse cursor to All Programs.
- Point the cursor to Accessories, then to System Tools.
- Select System Restore.
- Click Create a restore point.
- Click Next.
- Type an appropriate name in the Restore Point Description text box.
- Click Create.
- Click Close.
To Restore to an earlier restore point
- Click the Start button.
- Point your mouse cursor to All Programs.
- Point the cursor to Accessories, then to System Tools.
- Select System Restore.
- click Restore my computer to an earlier time
- Select the restore point description
- Click Next
When you don't want anyone to read or write to your Word document, you can apply some protection by locking your document. Word offers several levels of protection, all of which you can access in the same way.
To protect a MS Word Document we need to do the following:
Click the Office button. Then click Save As.
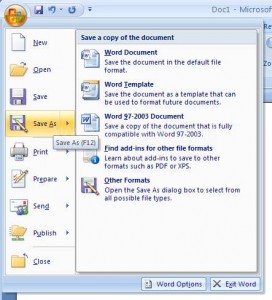
Click Tools. Then click General Options.
A General Options box will pop up

Type a password in the Password to open box.
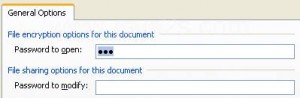
Select or clear the Read-only recommended check box. Click OK.

Type your desired password for opening the Word Document and the password for modifying the document in the respective boxes and that is all.
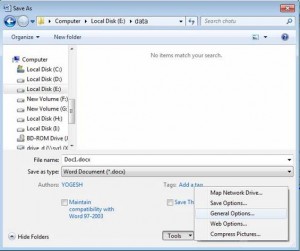
Open the Excel 2007 file that you intend to password protect and lock Click the office button on the top left
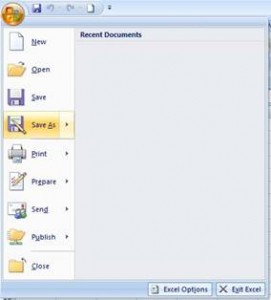
Select Save As
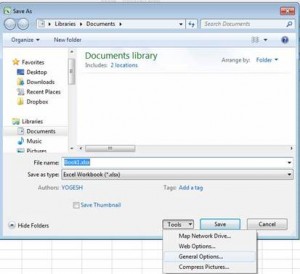
Click on Tools
Select the General Options
A password dialog box will open
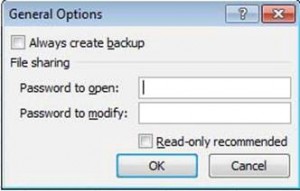
Type your desired password for opening the Excel Document and the password for modifying the document in the respective boxes and that is all. When you try opening the password protected excel document, you will be asked to enter the password. However, if your forget or lose the password, it cannot be recovered easily. You may have to make use of a password recovery software to recover the password. Hence it is advisable to maintain a list of passwords and their corresponding document names at a safe and secure place.
Useful Links
Google Search: "online puzzles for adults"
https://www.mindgames.comhttps://sharpbrains.com/brainteasers
https://thejigsawpuzzles.com
http://www.jigsawplanet.com
Hindi Lyrics
http://catchylyrics.net/old-songs-lyrics-hindi-moviesHindi Song Notes
http://www.hitxp.com/keyboard-music-notes/hindi-songshttp://www.synthesizernotes.com